A lot of users are complaining that their Intel Intel(R) Wi-fi 6 AX201 160MHz stopped working. When they tried running Network Diagnostic, the following error message is displayed.
The Intel(R) Wi-Fi 6 AX201 160MHz adapter is experiencing driver- or hardware-related problems.
In this article, we are going to show what to do if Intel(R) Wi-fi 6 AX201 160MHz is not working.
How do I fix Intel(R) WIFI 6 AX200 160MHz not working?
Before troubleshooting the issue, we need to know why this is happening. Mostly the driver will fail to work if it got corrupted. There are various reasons that can make the driver corrupt such as failed installation or download that is usually caused when installation is stopped in the middle of a process. The files can also get corrupt because of malware or virus. We will be seeing how to fix corrupted drivers, hereinafter. The issue can also be a glitch in the network protocols or the settings. The good news is that it can be resolved easily. You just need to reset the settings or protocols to fix the issue in that case.
Fix Intel(R) Wi-fi 6 AX201 160MHz not working
if Intel(R) Wi-fi 6 AX201 160MHz is not working, then, first of all update your computer. Updating will do the trick for you if the adapter is not working because of a bug. After that, try the following solutions to resolve the issue.
Let us talk about them in detail.
The Intel(R) Wi-Fi 6 AX201 160MHz adapter is experiencing driver- or hardware-related problems
1] Switch to a different driver
First up, we are going to use a different driver if available and see if that works. We are going to use an old driver from the available ones. Follow the given steps to do the same.

After switching to a different driver, restart the system, and see if the issue persists.
2] Reinstall your Intel Driver
Maybe your Intel Driver got corrupted. If that is the case, we need to reinstall it. Now, even though after uninstalling the driver, Windows can detect an install automatically by just clicking a button. But, we would recommend you download the latest version of your driver from Intel.com. Since your computer doesn’t have a WiFi driver, it won’t connect to a wireless network. So, you can use an ethernet cable or download the driver on some other system and use a USB to transfer it to your computer.
To uninstall the Intel driver, follow the prescribed steps.
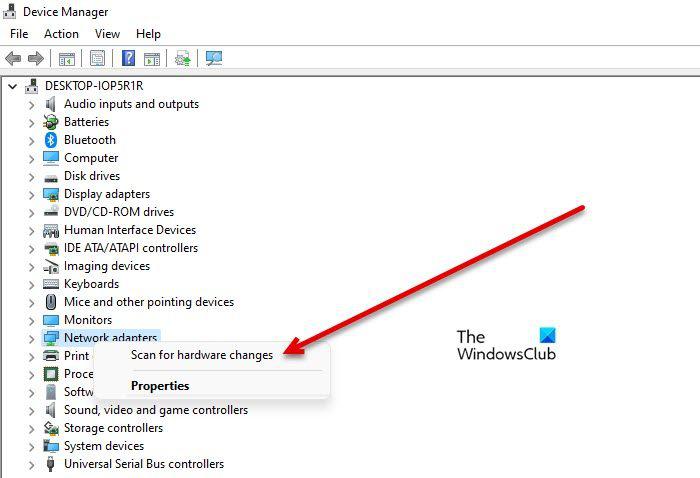
After uninstalling the driver, restart your computer. Then open Device Manager, click on Scan for hardware changes, or right-click on Network adapters, and then select Scan for hardware changes.
This will install the driver, at least you will be able to Internet afterward. In case, the correct driver is not installed or no driver is installed, install the file that we downloaded earlier. Hopefully, this will do the job for you.
3] Reset Network Settings
Maybe the Network Settings have been configured in such a way that it stops the Intel WiFi 6 driver from working. We have to reset the network settings and see if that helps. Follow the given steps to do the same.
Windows 11
Windows 10
On both platforms, you need to follow the on-screen instructions to complete resetting.
4] Reset Network Protocols
The issue can be nothing but a glitch. This glitch usually is in the network protocols. We are going to release and renew IP, reset Winsock, and flush DNS and check if it works. To do that, open Command Prompt and run the following commands.
ipconfig /releaseipconfig /renewipconfig /flushdnsipconfig /registerdnsnetsh winsock reset
Hopefully, this will do the job for you.
That’s it!
How do I fix my Intel WIFI adapter?
To fix WiFi Adapter, first, make sure that it is enabled. To do that open the Control Panel, change View by to Large icons, click Network & Sharing Center > Change adapter settings. Right-click on WiFi and select Enable if it is disabled.
If the driver is enabled, then run the Network troubleshooter from the Command Prompt.
In case that doesn’t work, then try the aforementioned solutions to resolve the issue.
Also check: Fix IPv6 Connectivity, No network access error on Windows 11/10.


